Adding a New Region to your Theme

Adding a custom region to any Drupal theme is fairly easy. For this example, I'm working within a Zen Ninesixty subtheme. I decided that instead of just using the right sidebar, I wanted to have a custom region inside the main content area so that the text would wrap around whatever I placed here. (By default, the main content area does not wrap around left or right sidebars.)
Creating the Region
First, I added a region called content_top to my page.tpl.php file by simply copying the content_right php code and changing the variables and div ID's from content_top to content_right. Here is a snippet of my page.tpl.php is shown with the existing content_top region and my new content_right region:
	<?php if ($content_right): ?>
          <div id="content-right" class="region region-content_right">
            <?php print $content_right; ?>
          </div> <!-- /#content-right -->
          <?php endif; ?>


          <?php if ($content_top): ?>
          <div id="content-top" class="region region-content_top">
            <?php print $content_top; ?>
          </div> <!-- /#content-top -->
          <?php endif; ?>

          <div id="main-content" class="region clear-block">
            <?php print $content; ?>
          </div> <!-- /#main-content -->
Then in my zen_ninesixty.info file, I added a region called content_right. This tells the theme that this new region exists and it now appears in the region drop-downs on the blocks page.
	regions[left]           = left sidebar
	regions[right]          = right sidebar
	regions[navbar]         = navigation bar
	regions[content_top]    = content top
	regions[content_right]  = content right
	regions[content_bottom] = content bottom
	regions[header]         = header
	regions[footer]         = footer
	regions[closure_region] = closure
Styling
Next, I went to my styles.css file and added some positioning styles to this new region. I wanted blocks in this region to float the right of the anything in the content area, and I also added a little margin to the left to keep it from bumping into the content. Additionally I added padding to the inside of blocks that appear within this region.
Because I am working within the Zen Ninesixty theme and using the Block Class module, I intentionally did not specify a width here. I want to specify the width from inside the block itself using the block class field. This will allow me to specify a different width for each block in this region if I choose.
	#content-right .block {
	  float: right;
	  margin-left: 20px;
	  border: 1px solid #ccc;
	}
	#content-right .block-inner {
	  padding: 10px;
	}
(Note: the border is unnecessary but was added to given a visual indicator of where the region exists in the screen shot below.)
Adding a Block to the Region
Finally I'm ready to create a block. From the admin menu, I go to Site Building > Blocks > Add Block. In the Block Class Settings field, I add the class grid-4, which tells my block to span 4 columns, or a width of 300px in a 12-column grid. This width is being pulled from the already existing 960.css file.

The result is a new region as shown below:
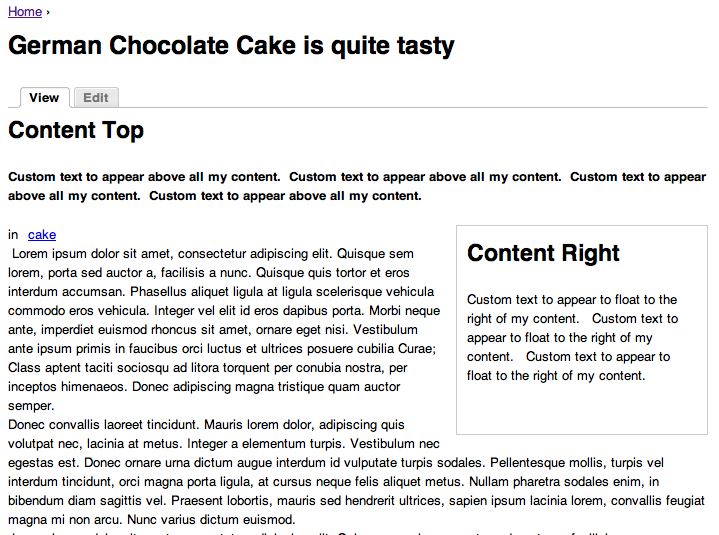
![]()
Caravan is a powerful and full-featured membership management system, designed specifically for membership- driven organizations.
![]()
Trailhead is a Drupal-based system, built with the features smaller businesses need, bundled together into a ready-to-launch package.
Our Work
 |
 |
 |
 |
 |
 |
 |
 |
 |
On the Trail Blog
-
We are thrilled to share that one of our...
-
Steve was recently invited to write a...
-
We have some really exciting projects in...